Fresh install of macOS Sequoia

Different approach this time. I did an in place upgrade to Sequoia a while back and am only now getting to clean it back to a fresh install via their new functionality.
Pre clean
- Back up list of applications:
ls > applications-2025-08-17.txt - Back up list of brew apps (includes casks):
brew list > brew-list-2025-08-17.txt - Check through
~/Projectsdirectory, delete anynode_modulesdirs and then and copy anything worth keeping to Dropbox - Check
github/infuernodirectory for the same and push outstanding changes to git - Back up list of dot files:
ls -a .* > dotfiles-2025-08-17.txt(message about.Trash) - Check through dot files and back up anything worth keeping
- Check through downloads and move anything worth keeping to Dropbox
Instructions
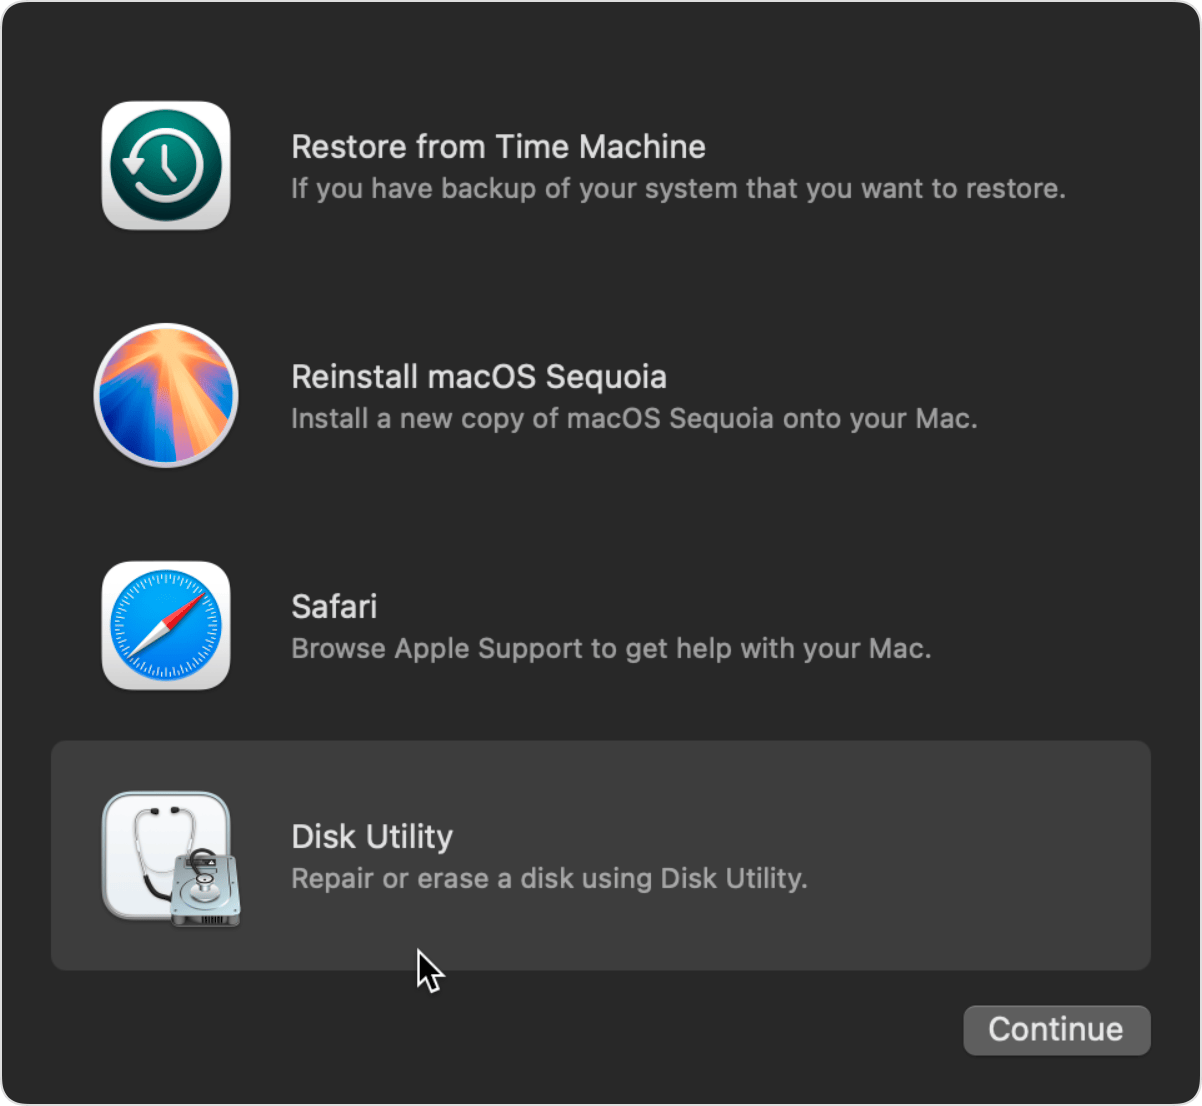
There are so many conflicting instructions. I want as best as possible a clean reinstall without have to use a USB stick. Via "Internet Recovery" appeared to be the way forwards with a reformat of the drive first. I followed these instructions in the end followed up by the reinstall:
Use Disk Utility to erase a Mac with Apple silicon – Apple Support (UK)
How to erase (format) the built-in startup disk of a Mac with Apple silicon.
Initial estimate for the reinstall was 3 hours 33 minutes, quickly down to 2 hours 6 minutes, and in the end completed in way less than an hour (I went out so didn't get the exact details).
Set up
- Go through set up wizard
- Trackpad, finder and terminal prefs
- Check for software updates (none)
- Change computer name and reboot
- Install homebrew
brew install iterm2> set to solarized theme, fix "Bright Black" color, otherwise can't see text completions (the ANSI colors black in the second column - needs to be more of a "grey")brew install 1password> authenticatebrew install alfred> set up wizard, universal actions hotkey, turn on web bookmarks for safari, turn on clipboard history, snippets, enable 1password- Safari > turn on status bar and enable developer menu
brew install rectangle> set as rectangle keys and disable macOS when promptedbrew install shottr> activatebrew install dropbox> customized the default location since it has apparently moved, sync everything, but choose online by defaultbrew install font-hack-nerd-font> update iTerm fontbrew install starship> copy old .toml config into place- Set up SSH: https://docs.github.com/en/authentication/connecting-to-github-with-ssh/generating-a-new-ssh-key-and-adding-it-to-the-ssh-agent
brew install zap> seems to be a better alternative to oh-my-zsh, disable the prompt - there is a plugin for starship prompt, but not sure the purpose- Install ohmyzsh, install 5 plugins, turn off "marks" in iterm2 which shows a strange arrow at the beginning of the line - something to do with the custom prompt from the ohmyzsh theme ... (I thought I was using the starship prompt)
brew install nvm> check instructions about creating .nvm dir etc,nvm install --ltsbrew install visual-studio-code> sync settingsbrew install gh>gh auth login- Useful for finding where an alias is set: https://www.ashryan.io/finding-out-where-zsh-alias-and-settings-are-defined/